 Rackmount PC
 Embedded Computing
 Industrial Panel PC
 Wall Mount PC
 Rugged Tablets
 Rugged Laptop
 Industrial Portable Computers
 Rugged Handheld
 Advantech Industrial PC
Blog
How to check bios version?
Table of Contents
- 1. Introduction
- 2. Methods to Check BIOS Version
- 3. Manufacturer-Specific Methods
- 4. Considerations Before Updating BIOS
- 5. Conclusion
I. Introduction
| Method | Steps |
|---|---|
| System Information Tool | Run msinfo32 and look for "BIOS Version/Date". |
| Command Prompt | Enter wmic bios get smbiosbiosversion. |
| DirectX Diagnostic Tool | Run dxdiag and check under the "System" tab. |
| BIOS Setup Utility | Restart and enter BIOS (F2, F10, or Del key). |
Methods to Check BIOS Version
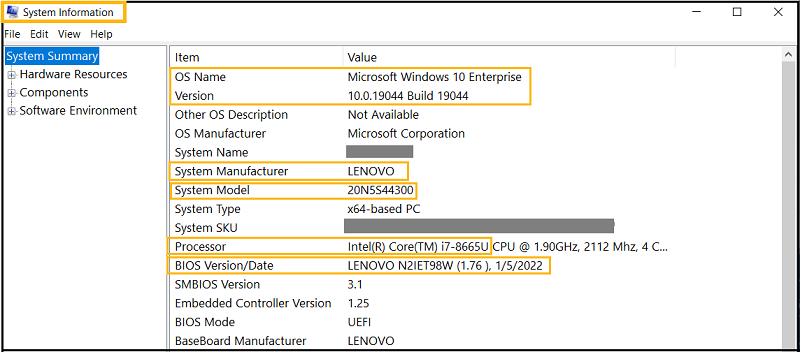
A. Using System Information Tool (msinfo32)
The System Information Tool is one of the easiest ways to check your BIOS version without restarting your computer.
Steps:
- Press
Windows + Rto open the Run dialog box. - Type
msinfo32and press Enter. - In the System Summary section, locate "BIOS Version/Date".
- Note down the BIOS version and manufacturer details for reference.
This method is quick and does not require technical expertise.
B. Using Command Prompt (WMIC Command)
For users who prefer command-line tools, the Windows Management Instrumentation Command (WMIC) can retrieve the BIOS version instantly.
Steps:
- Press
Windows + S, type "Command Prompt", and select Run as administrator. - Enter the following command and press Enter:
-

-
C. Using DirectX Diagnostic Tool (dxdiag)
The DirectX Diagnostic Tool provides comprehensive system details, including BIOS version information.
Steps:- Press
Windows + R, typedxdiag, and press Enter. - Wait for the DirectX Diagnostic Tool to load.
- Under the System tab, locate the BIOS version in the System Information section.
This method is particularly useful for users diagnosing hardware and driver-related issues.
- Press
-
D. Checking the BIOS Version via BIOS Setup
If Windows is not accessible, you can check the BIOS version directly from the BIOS Setup Utility during startup.
Steps:- Restart your computer.
- Immediately press the BIOS key (usually F2, F10, Del, or Esc) when the manufacturer logo appears.
- Once in the BIOS menu, navigate to the Main or Information tab.
- The BIOS version will be displayed on the screen.
This method is ideal for pre-boot diagnostics and advanced troubleshooting.
E. Using Third-Party Software (CPU-Z, Speccy, etc.)
For users who want detailed system analysis, third-party tools like CPU-Z or Speccy can provide an easy way to check the BIOS version along with other system details.
Steps:
- Download and install a tool like CPU-Z or Speccy.
- Open the software and navigate to the Mainboard or BIOS section.
- The BIOS version and manufacturer details will be displayed.
This method is helpful for users who want an in-depth look at their system’s hardware configuration.
-
Comparison of BIOS Version Check Methods
Method Ease of Use Requires Restart? Additional Information Provided System Information (msinfo32) ⭐⭐⭐⭐⭐ No Basic BIOS info Command Prompt (WMIC) ⭐⭐⭐⭐ No Quick version lookup DirectX Diagnostic Tool (dxdiag) ⭐⭐⭐ No Limited BIOS details BIOS Setup Utility ⭐⭐⭐ Yes Detailed BIOS settings Third-Party Software (CPU-Z) ⭐⭐⭐⭐ No Extensive system info
Manufacturer-Specific Methods
While general methods like System Information (msinfo32) and Command Prompt (WMIC) work across most systems, some PC manufacturers provide unique ways to check the BIOS version. This section covers manufacturer-specific methods for ASUS, ASRock, Lenovo, and MSI systems.
A. ASUS: How to Check BIOS Version
ASUS motherboards and laptops allow users to check the BIOS version using both Windows tools and the BIOS setup utility.
Method 1: Using BIOS Setup
- Restart your ASUS computer.
- Press F2 or Del repeatedly during boot to enter the BIOS menu.
- Navigate to the Main tab.
- The BIOS version will be listed as “BIOS Version” or “Firmware Version.”
Method 2: Using MyASUS Software
- Open the MyASUS application.
- Click on System Information.
- Under the BIOS Information section, locate the BIOS version.
Method 3: Using Command Prompt
Run the following command in Command Prompt:
wmic bios get smbiosbiosversion
B. ASRock: Checking BIOS Version
For ASRock motherboards, users can find the BIOS version using the BIOS setup utility or by inspecting a sticker on the board.
Method 1: Using BIOS Setup
- Restart your ASRock PC and press F2 or Del to enter the BIOS menu.
- Locate the BIOS version under the Main tab.
Method 2: Checking the BIOS Chip Sticker
- On some ASRock motherboards, the BIOS version is printed on a white sticker attached to the BIOS chipset.
- The sticker usually contains a version number like P2.10 or P3.20, indicating the installed BIOS firmware.
C. Lenovo: How to Find the BIOS Version
Lenovo laptops and desktops support multiple ways to check the BIOS version.
Method 1: Using Lenovo Vantage
- Open the Lenovo Vantage app.
- Navigate to Device Information → BIOS Version.
Method 2: Using BIOS Setup
- Restart your Lenovo device.
- Press F1 (or Fn + F1) when the Lenovo logo appears.
- The BIOS version will be displayed in the Main tab.
Method 3: Using Command Prompt
Run the following command:
wmic bios get smbiosbiosversion
This method works universally across Lenovo ThinkPad, IdeaPad, and Legion models.
D. MSI: Checking BIOS Version
MSI motherboards and gaming laptops offer multiple ways to view the BIOS version.
Method 1: Using BIOS Setup
- Restart your MSI system and press Del during boot.
- In the BIOS menu, navigate to the Main section.
- The BIOS version will be displayed.
Method 2: Using MSI Center Software
- Install and open MSI Center.
- Navigate to System Information → BIOS Version.
Conlusion
Whether you're troubleshooting boot issues, preparing for a BIOS update, or verifying system details, knowing how to locate your BIOS version is a critical step in system maintenance. It ensures compatibility with hardware upgrades, improves stability, and addresses security vulnerabilities. For industrial applications, devices such as a 4U rackmount computer or a portable industrial PC require stable firmware to ensure smooth operations in demanding environments.
✔ Multiple Methods Available – You can check the BIOS version using built-in Windows tools like System Information (msinfo32), Command Prompt (WMIC), or the DirectX Diagnostic Tool (dxdiag). Advanced users managing Advantech industrial PC systems or an industrial rackmount PC can also access the BIOS Setup Utility during boot for detailed firmware management.
✔ Manufacturer-Specific Approaches – Major brands like ASUS, ASRock, Lenovo, and MSI provide additional ways to check the BIOS firmware version, such as using MyASUS, Lenovo Vantage, or MSI Center. Users working with a 1U rack PC or a rugged tablet PC OEM may also have specialized BIOS update tools provided by their manufacturers.
✔ Update BIOS Only When Necessary – A BIOS update is not always required. If your system is stable and running smoothly, updating may not be necessary. However, if you're experiencing hardware compatibility issues, encountering system bugs, or need a security patch, an update might be beneficial. For high-performance tasks, an industrial PC with GPU might require a BIOS update to unlock advanced processing capabilities.
For rugged environments, devices like an IP65 laptop or the best tablet for motorcycle navigation must have reliable firmware to operate in extreme conditions. Additionally, choosing trusted rugged tablet manufacturers ensures that your hardware is built for durability and long-term use.
By using the appropriate method to check your BIOS version and following precautionary steps before updating, you can maintain a stable, secure, and optimized system.


SINSMART 8 inch industrial Vehicle Tablet PC GPS Outdoor Dustproof and Waterproof IP65
▶ Ubuntu operating system with a quad-core Intel JASPER LAKE N5100 processor with a high-speed capacity of up to 4GB and 64GB.
▶ Outdoor worker visibility is ensured by an 8-inch screen with a 700-Nit high brightness display, a multiple-point touch panel, and customized buttons.
▶ Bluetooth 5.0, dual-band Wi-Fi, and 4G LTE connectivity. multi-satellite GPS, Glonass, and Beidou systems.
▶ 8 Inch Rugged Tablet has a charging interface for aviation plugs, a switchable cigarette lighter interface or a Φ5.5 power connector, and an optional external 9V-36V DC broad voltage module.
▶ Supports a second extra 7.4V/1000mAh battery and battery-free mode.
▶ Dustproof and waterproof, IP65 has evolved to withstand outdoor applications that are subject to shock, vibration, and severe temperatures.
▶ Dimensions : 218.1*154.5*23.0 mm, weight about 631g
▶ Model: SIN-0809-N5100(Linux)

SINSMART Intel Core Ultra 15.6 inch Rugged AI PC windows AI +11 laptop IP65 & MIL-STD-810H
▶ Intel Core Ultra Processor Providing effective AI power, the Intel® CoreTM Ultra processor has a dedicated AI engine (NPU)
▶ Dedicated-level performance with Intel® Arc™ Graphics and Xe LPG architecture
▶ SIN-S1514E Military Laptops for Sale Unlock smooth productivity with Windows + AI Windows 11 OS Dual Memory/Dual Storage Slots
▶ The Thunderbolt 4 Interface HDMI 2.0, RJ45, RS232, and other high-speed Thunderbolt 4 interfaces. smooth integration of several gadgets
▶ Dual-Battery High-Capacity 56Wh + 14.4Wh battery. The large battery can be removed. Modifiable Modes for Flexibility
▶ Dimensions: 407*305.8*45.5mm
▶ Model: SIN-S1514E
LET'S TALK ABOUT YOUR PROJECTS
- sinsmarttech@gmail.com
-
3F, Block A, Future Research & Innovation Park, Yuhang District, Hangzhou, Zhejiang, China
Our experts will solve them in no time.